This is the first of a three part series on how Amazon’s VPC (Virtual Private Cloud) networking works, and how to create a VPC and provision resources within a it. First things first, what is a VPC? Amazon’s VPC documentation explains it this way :
“Amazon Virtual Private Cloud (Amazon VPC) enables you to launch Amazon Web Services (AWS) resources into a virtual network that you’ve defined. This virtual network closely resembles a traditional network that you’d operate in your own data center, with the benefits of using the scalable infrastructure of AWS.”
In a nutshell, a VPC is like a remote datacenter network. While there are many differences, here are a few ways an AWS VPC is similar to a remote datacenter network:
- You can specify IP addressing, subnetting and routing
- You can’t physically access the VPC, you must use remote access tools such as SSH or RDP
- The VPC operates independently of your corporate network, but can be connected by VPN
- The VPC has it’s own Internet connectivity, NAT and firewall rules
- The VPC Internet is probably much faster and more reliable than your corporate network
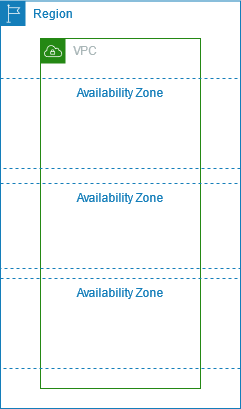
Now that you understand what a VPC is, what are the basic building blocks? Like any ordinary network, a VPC has a physical layer. All of the switching, routing and cabling hardware you would have to set up by hand is automagically configured for you. When you create a VPC, you specify only two things: the name and the CIDR block. You can specify any name you like, and any IPv4 CIDR block as large as /16. While the name can be changed at any time, the CIDR block cannot be adjusted after the VPC is created, so be sure to plan your network addressing carefully. It’s important to note that IPv6 is not currently supported in AWS VPCs.
Once you’ve created the VPC, you can then define subnets. The most important considerations when creating VPC subnets is which AZ (Availability Zone) you want each subnet to exist in, and how much of your VPC CIDR block to assign to each subnet. Subnets can be deleted and recreated with new settings, but only when no AWS resources (EC2 Instances or ELBs) are provisioned in those subnets. This gives you a good reason to provision a much larger CIDR block than you think you need, in case you want to recreate your subnets with an alternate subnetting or AZ layout.

The next step is to provision the Internet access and routing for your VPC. By default, routing among the subnets in the VPC work automatically. To provide Internet access, you must first provision an Internet Gateway.
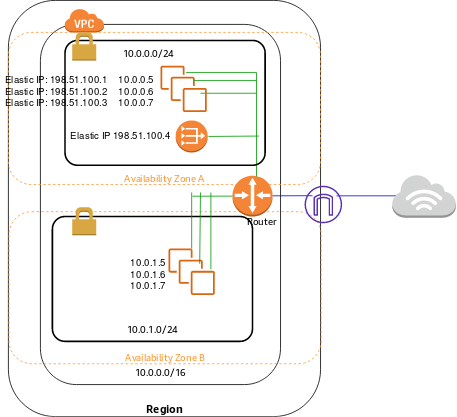
The Internet Gateway allows bi-directional traffic to and from your VPC. This means that EC2 instances in your VPC will each have a public IP address and can access resources on the Internet, also that the Internet can access your instances.
Once you have created your Internet Gateway, you’ll need to configure routing for your public subnets. This is done by creating a custom routing table which routes to the Internet, i.e. 0.0.0.0/0, via the Internet Gateway.
With bi-directional access, be sure to assign a Public IP or Elastic IP to any EC2 instance when you create it.
If you don’t want all of the EC2 instances in your VPC to have a public IP address, then you’ll also need a NAT Gateway. This allows you to hide private subnets behind the NAT Gateway with only outbound Internet access, and also have public subnets with routable IP address with bi-directional access.
Once you have created your NAT Gateway, you’ll need to configure routing for your private subnets. This is done by creating a custom routing table which routes to the Internet, i.e. 0.0.0.0/0, via the NAT Gateway.
With these steps completed, you now have a functional VPC. You can provision EC2 instances in a public subnet with bi-directional Internet access. You optionally can provision instances in a private subnet with only outbound access to download Internet content.
In the next installment of our series, we’ll cover how to to implement network access control with security groups.